Microsoft Dynamics 365 Business Central
My Top 10 Favorite Things #5
User Preferences and Personalization
Part 1

Microsoft Dynamics 365 Business Central
My Top 10 Favorite Things
#5- User Preferences- Part 1
What Does This Mean?
Business Central will allow users to hide or add fields based on their own user interface. Users can also add a limited number of fields to forms and lists along with adding shortcuts and pinned pages.
Do I have to be a programmer or developer to make these changes?
No, that is the great part of the BC user interface. Making changes is very easy and does not require a developer for most minor changes.
Why User Customization?
No everyone enjoys or needs the same amount of data in their software. Customization allow the user to make the software fit their needs while not affecting other users in the system.
How do I hide fields and areas of the user interface?
From the main screen or any BC user interface window, click the gear icon and then click on personalize.

A new ribbon on the page should appear.

Sometimes software has really ugly, crowded interfaces. At times you wish you could remove the fields you don't need and add some of the fields you wish you had. There are also times you wish you could create a shortcut to a page you use often.
What if you could make data entry a whole lot easier by setting your tab/enter keys?
The Business Central user interface is very user friendly for customization and shortcuts. In this blog, I will show you how.
What Does This Mean?
Business Central will allow users to hide or add fields based on their own user interface. Users can also add a limited number of fields to forms and lists along with adding shortcuts and pinned pages.
Do I have to be a programmer or developer to make these changes?
No, that is the great part of the BC user interface. Making changes is very easy and does not require a developer for most minor changes.
Why User Customization?
No everyone enjoys or needs the same amount of data in their software. Customization allow the user to make the software fit their needs while not affecting other users in the system.
How do I hide fields and areas of the user interface?
From the main screen or any BC user interface window, click the gear icon and then click on personalize.
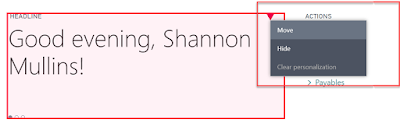
On the window, click on the top right section of an area or field you wish to hide.

Here you can select whether to move or hide this section. If you click hide, the section will be hidden from the screen until you clear any personalizations.

When we are done, we will save our personalization. Note: you can hide or move any field during this time. When you are done, you must save.

Excluding Fields from Quick Entry
Fields on an entry window can be hidden, moved, or excluded from quick entry. This means as you hit enter through the fields, the cursor will not land on these fields. This will save time during the time entry portion of BC. To exclude a field from quick entry, go back into the personalize mode from the top-right gear icon.


1. Show
2. Hide
3. Show under "Show More"
4. Show under "Show Less"
5. Exclude from Quick Entry
In this case, we will choose number 5 to exclude from quick entry to exclude the cursor from landing on it during entry. We also could choose to hide the field, if we are never going to use it. Show more and show less are BC ways of expanding and contracting the entry forms to make it more user friendly.
After you are done making your changes, don't forget to save your personalizations.

Adding a Field to a List
On the lists and forms, you should see the + Add Field Icon on the personalization bar. In my sample, I am on a vendor list and I want to add a field.

When you click on this, a right navigation list will appear with a list of fields you can add. Note, any field not in this list that you want to add will require a BC extension (Customization).

To add the field, drag and drop it on the list where the red line appears. In my case, I dragged and dropped vendor posting group. You can also drag and drop the columns to change their order or drag and drop a column off of the list.

When you are done, don't forget to save your personalizations.
In my next blog post, I will cover shortcuts and expanding/increasing page size.
Comments
Post a Comment